Note: Before you buy anything, consider making a search for similar online e-shops, to compare Pricing, Warranty, and Total Costs [+ VAT + Import Tax + Shipping] to read Reviews, and Confirm the purchased item e.g. hardware PC, meets the Recommended [Not-Minimum Requirements, to be your Purchase Future Proof] Requirements of the Software you will be using… e.g.
helpx.adobe.com [premiere-pro/system-requirements.html]
https://helpx.adobe.com/cy_en/premiere-pro/system-requirements.html
Your computer must meet the minimum technical specifications outlined below to run Adobe Premiere Pro. For optimum performance, use recommended system specifications.
Applicable for:
Premiere Pro version 24.0. View previous [2023] system requirements: here.
System requirements [2024] for Premiere Pro:
Minimum and recommended system requirements for Windows
Minimum and recommended system requirements for macOS
Note:
Minimum specifications are for editing HD video. Recommended specifications are for editing video HD, 4K, or higher resolutions.
From <https://helpx.adobe.com/premiere-pro/system-requirements.html>
Title–1: “Choosing the Perfect Workstation for 4K Video Editing with Premiere Pro 2024”
In the fast-evolving realm of video editing, where 4K content has become the new standard, selecting the right workstation is crucial. Adobe Premiere Pro 2024 demands robust hardware to unleash its full potential. In this guide, we’ll explore the key factors to consider when purchasing a workstation tailored for 4K video editing, specifically optimized for Adobe Premiere Pro 2024.
1. Processor Power: Premiere Pro thrives on a potent processor, and for 4K editing, you need nothing short of a powerhouse. Aim for a multi-core processor with high clock speeds, like Intel’s i9 or AMD’s Ryzen 9 series, to handle the immense data processing demands of 4K video rendering.
2. Graphics Card (GPU): The GPU is the unsung hero of video editing. Adobe applications, especially Premiere Pro, heavily rely on GPU acceleration. Invest in a top-tier graphics card, such as NVIDIA’s RTX series or AMD’s Radeon Pro, to ensure seamless playback and real-time editing of 4K footage.
3. RAM Requirements: Video editing is notorious for being a memory-intensive task. Opt for at least 32GB of RAM, but if your budget allows, consider pushing it to 64GB or more. This ensures smooth multitasking and minimizes the risk of bottlenecks during complex editing sessions.
4. Storage Solutions: High-resolution video files demand ample storage space and rapid data transfer rates. Invest in a combination of SSDs for the OS and applications and high-capacity HDDs for storing raw footage. NVMe SSDs provide lightning-fast read and write speeds, significantly improving project loading times.
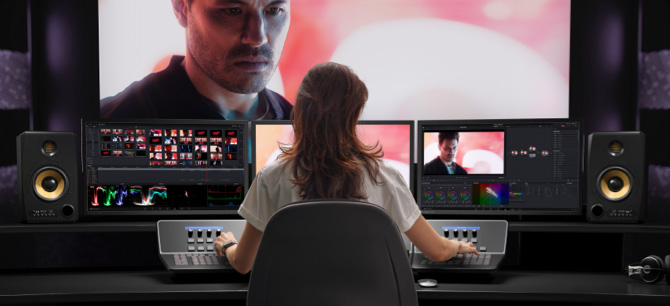
5. Display Considerations: A high-quality, color-accurate monitor is crucial for video editing. Choose a 4K monitor with HDR support for accurate color grading. Additionally, consider a dual-monitor setup for enhanced workflow efficiency.
6. Connectivity and Ports: Ensure your workstation has a variety of ports for external devices such as cameras, storage drives, and audio interfaces. USB-C, Thunderbolt, and SD card slots are essential for seamless data transfer.
7. Cooling Solutions: The processing power required for 4K editing generates a significant amount of heat. Invest in a workstation with efficient cooling solutions, such as liquid cooling, to maintain optimal performance and prevent thermal throttling.
8. Future-Proofing: Technology evolves rapidly, and your workstation should be equipped to handle future advancements. Choose a motherboard that supports future upgrades, ensuring your investment lasts for years to come.
9. Budget Allocation: Building the perfect workstation involves finding the right balance between performance and budget. Prioritize components like CPU, GPU, and RAM, as these directly impact editing performance. Allocate resources wisely based on your specific needs and budget constraints.
10. Reviews and Recommendations: Before making a final decision, read reviews and seek recommendations from fellow video editors. Online communities, forums, and professional reviews can provide valuable insights into the real-world performance of different workstation configurations.
In conclusion, investing in a workstation for 4K video editing with Adobe Premiere Pro 2024 is a nuanced process. By considering the processor, GPU, RAM, storage, display, connectivity, cooling, future-proofing, budget allocation, and gathering insights from reviews, you can tailor a system that meets your editing demands and propels your creative projects to new heights. Happy editing!
Title–2: “A Guide to Choosing the Ideal 8K Video Editing, Workstation for Adobe Premiere Pro 2024 and DaVinci Resolve 18.5”
In the dynamic landscape of video editing, the demand for 8K content creation is on the rise. Whether you’re a professional video editor working with Adobe Premiere Pro 2024 or DaVinci Resolve 18.5, selecting the right workstation is paramount. This guide will navigate you through the crucial considerations when purchasing a workstation tailored for the intensive requirements of 8K video editing.
1. Processor Dominance: The heart of your workstation, the processor, should be a juggernaut. Opt for high-core-count CPUs like Intel’s Core i9 or AMD’s Ryzen 9 series to handle the immense data crunching needed for editing 8K footage.
2. Graphics Powerhouse (GPU): Both Premiere Pro and DaVinci Resolve heavily rely on GPU acceleration. Invest in a top-tier graphics card, such as NVIDIA’s RTX series or AMD’s Radeon Pro, with ample VRAM to facilitate real-time editing, color grading, and rendering of 8K content.
3. Mammoth RAM Requirements: Video editing at 8K demands a substantial amount of memory. Aim for a minimum of 64GB of RAM to ensure smooth playback and efficient handling of large video files. If your budget permits, consider going even higher to 128GB for optimal performance.
4. Storage Speed and Capacity: 8K video files are massive, and your storage solution needs to match. Opt for NVMe SSDs with high read and write speeds for the OS, applications, and project files. Complement this with large-capacity HDDs for storing raw 8K footage.
5. Color-Accurate Displays: A high-quality monitor with accurate color representation is indispensable for 8K video editing. Choose a 4K or 8K display with HDR support to ensure precise color grading in both Premiere Pro and DaVinci Resolve.
6. Connectivity Galore: A plethora of ports is essential for seamless connectivity with external devices. Ensure your workstation has USB-C, Thunderbolt, and various card slots to accommodate the diverse range of peripherals used in professional video editing.
7. Cooling Solutions for Sustained Performance: The processing power required for 8K editing generates substantial heat. Select a workstation with efficient cooling solutions, such as liquid cooling, to maintain peak performance during prolonged editing sessions.
8. Future-Proofing Investments: 8K video editing is at the forefront of content creation, and technology is ever-evolving. Choose a motherboard that supports future CPU and GPU upgrades to keep your workstation relevant as technology advances.
9. Budgeting Wisely: Building a workstation for 8K video editing involves strategic budget allocation. Prioritize components like CPU, GPU, and RAM, as these directly impact editing performance. Balance your budget while ensuring each component meets the demands of 8K content creation.
10. Software Compatibility: Both Adobe Premiere Pro 2024 and DaVinci Resolve 18.5 have specific hardware requirements. Check their official documentation for compatibility, ensuring your chosen components align with the recommended specifications for optimal performance.
In summary, unlocking the full potential of 8K video editing with Adobe Premiere Pro 2024 or DaVinci Resolve 18.5 requires a well-thought-out workstation. By carefully considering the processor, GPU, RAM, storage, display, connectivity, cooling, future-proofing, budgeting, and software compatibility, you can assemble a powerhouse that elevates your 8K editing experience to new heights. Happy editing!
Note: Similar Software e.g., Adobe Premiere Pro vs. DaVinci Resolve — may have different requirements, so you must search for it … e.g., Software-A uses Graphics Card more, while Software-B may use Processor more…
https://www.blackmagicdesign.com/products/davinciresolve
Two Great Versions

DaVinci Resolve
DaVinci Resolve is the world’s only all-in-one solution for editing, color, VFX, motion graphics, and audio! The free version works with virtually all 8‑bit video formats at up to 60fps in resolutions as high as Ultra HD 3840 x 2160. The free version includes multi-user collaboration and HDR grading!
DaVinci Resolve Studio
Includes everything in the free version plus the DaVinci Neural Engine, dozens of additional Resolve FX, temporal and spatial noise reduction, stereoscopic 3D, film grain, optical blur and mist effects, and more. It also supports 10‑bit video at up to 120 frames per second and resolutions beyond 4K.
https://helpx.adobe.com/cy_en/premiere-pro/system-requirements.html
Your computer must meet the minimum technical specifications outlined below to run Adobe Premiere Pro 24.0/2024. For optimum performance, use recommended system specifications.
Minimum and recommended system requirements for Windows
| Minimum | Recommended | |
|---|---|---|
| Processor | Intel® 6th Generation or newer CPU – or AMD Ryzen™ 1000 Series or newer CPU Advanced Vector Extensions 2 (AVX2) Support required Note: it is not possible to install the 24.0 versions on Intel® 3rd Generation of processors or older (as well as older AMD processors). | Intel® 11th Generation or newer CPU with Quick Sync – or AMD Ryzen™ 3000 Series / Threadripper 2000 series or newer CPU |
| Operating system | Windows 10 (64-bit) V20H2 or later | Windows 10 (64-bit) version 22H2 (or later) or Windows 11. |
| Memory | 8 GB of RAM | 16 GB of RAM for HD media32 GB or more for 4K and higher |
| GPU | 2 GB of GPU memory | 4 GB of GPU memory for HD and some 4K media6 GB or more for 4K and higher |
| Storage | 8 GB of available hard disk space for installation; additional free space required during installation (will not install on removable flash storage)Additional high-speed drive for media | Fast internal SSD for app installation and cache additional high-speed drive(s) for media |
| Display | 1920 x 1080 | 1920 x 1080 or greaterDisplayHDR 1000 for HDR workflows |
| Sound card | ASIO compatible or Microsoft Windows Driver Model | ASIO compatible or Microsoft Windows Driver Model |
| Network storage connection | 1 Gigabit Ethernet (HD only) 10 Gigabit ethernet for 4K shared network workflow |


