I think this the easiest method to reset password in Windows 10/11.
You need to know the shortcut to go to Boot Menu to choose the CD or USB with Hirens-BootCD created with.
To reset a forgotten Windows 11 password using Hiren’s BootCD PE, follow these steps. This method works for both local and Microsoft accounts.
Instructions How-To create bootable media see further below at the end.
- Boot your computer with Hiren’s BootCD PE — DVD/Optical Disk or USB
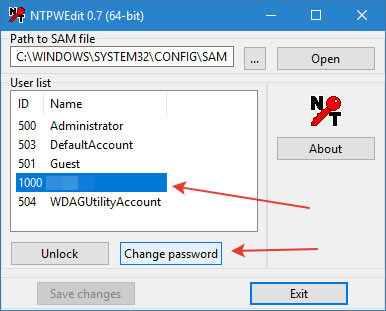
- Go to Start Menu -> Security -> Passwords -> NT Password Edit
- Open your SAM file (It is usually located in C:\Windows\System32\config\SAM)
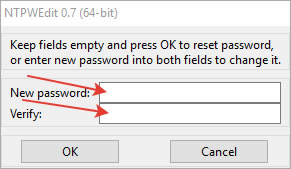
- Click your username and the click ‘Change password’. To set a password, type your password both ‘New password’ and ‘Verify’ fields and then click to ‘OK’. To remove the password, leave both ‘New password’ and ‘Verify’ fields blank and then click to ‘OK’.
🔧 What You’ll Need
- A USB flash drive (at least 8 GB) or a DVD-R/-RW/DL
- Access to another working PC to create the bootable USB
- The latest Hiren’s BootCD PE ISO file
- Rufus (a tool to create bootable USB drives) Or DVD Burner Software & DVD Burner Drive – e.g. Ashampoo Burning Studio FREE
🛠️ Step-by-Step Guide
1. Download Hiren’s BootCD PE
- Visit the official site: hirensbootcd.org
- Download the latest ISO file (e.g.,
HBCD_PE_x64.iso)
2. Create a Bootable USB with Rufus
- Download Rufus from rufus.ie
- Insert your USB drive into the working PC
- Open Rufus and select your USB under “Device”
- Under “Boot selection,” choose the Hiren’s ISO file
- Click “Start” and wait for the process to complete
3. Create a Bootable DVD DISK with Ashampoo Burning Studio
- Download Ashampoo Burning Studio FREE from https://www.ashampoo.com
- Insert your DVD Disk in the DVD RW drive into the working PC
- Open Ashampoo and select your Disk Image > Burn Image
- Under “Disc Image Path” choose the Hiren’s ISO file
- Click “Next” after choose your Burner DVD-RW/-R Drive and “Write” and wait for the process to complete
4. To boot to the Boot Menu
(also known as the One-Time Boot Menu) — without entering BIOS Setup or changing permanent boot order — you need to press a specific key at startup for your PC brand. Here’s a list of common brands and their Boot Menu keys:
✅ Boot Menu Keys by Manufacturer (for one-time boot device selection)
| Brand | Boot Menu Key | Notes |
|---|---|---|
| Dell | F12 | Tap during POST (when Dell logo shows). |
| Lenovo | F12 or Fn + F12 | Some models use the Novo Button (small pinhole button). |
| HP | Esc → F9 | First press Esc, then F9 for Boot Menu. |
| ASUS | F8 | Sometimes Esc is used instead. |
| Acer | F12 | May require enabling F12 Boot Menu in BIOS first. |
| MSI | F11 | Tap at splash screen. |
| Gigabyte | F12 | Standard across motherboards. |
| ASRock | F11 | Tap during splash screen. |
| Microsoft Surface | Volume Down + Power | Hold Volume Down, press Power, release when logo appears. |
| Samsung | Esc or F12 | Depends on model. |
| Toshiba | F12 | Tap at startup. |
| Sony VAIO | Assist or F11 | Newer models have a physical “Assist” button. |
💡 Tips:
- Press the Boot Menu key immediately after turning on the PC — start tapping it every second.
- If you see the OS loading, you missed the timing — restart and try again.
- On laptops with Fn Lock, you may need to hold
Fnalong with the function key (e.g.,Fn + F12).
===