For Windows 23H2 go here. For 24H2 Continue.
For the fastest answer: If the PC does Not support at all, then should appear the image in the end of this article. At the end also there are offers for buying a new Intel/AMD AI Mini-PC 3% off + No import Tax pay in the EEA/EU.
How Do You Know If Your PC Supports Windows 11 24H2:
- YES OK Normal upgrade,
- Requires a Bypass, or
- Does Not Support It at All – Supports bypass till 23H2
The upcoming Windows 11 24H2 update promises new features and optimizations, but not every PC will be able to install it. If you’re wondering whether your PC supports this update, needs a bypass, or simply won’t work with it, you’re not alone! In this article, we’ll guide you through the process of determining your PC’s compatibility with Windows 11 24H2, and what to do if it’s not fully supported.
1. What’s New in Windows 11 24H2?
Before diving into compatibility, let’s quickly cover why this update is important. Windows 11 24H2 is the next significant feature update after Windows 11 23H2. It brings a slew of enhancements to the user interface, security improvements, and new features aimed at improving productivity. While this update is exciting, Microsoft has strict system requirements, which could leave many older PCs behind.
2. Understanding the Basic Requirements for Windows 11 24H2
Let’s start with the basics. If your PC meets these minimum requirements, you’ll have no problem upgrading to Windows 11 24H2:
- Processor: Intel 8th-gen (2017) or newer (or equivalent AMD Ryzen processors)
- TPM (Trusted Platform Module): TPM 2.0 required for security
- Secure Boot: Your PC’s BIOS/UEFI must have Secure Boot enabled
- RAM & Storage: 4GB RAM minimum and at least 64GB of storage
If your PC was built after 2017 and has an Intel 8th-gen processor (or newer), then you’re in luck! Your system likely supports Windows 11 24H2 with no special tricks needed. Simply check for updates, and the in-place upgrade should run smoothly.
How to Check Compatibility
The easiest way to see if your PC can run Windows 11 24H2 is to check for updates in your system settings. If your PC is supported, Windows will allow you to download and install the update right away.
- Navigate to Settings > Update & Security > Windows Update
- Check for updates and see if Windows 11 24H2 is available
If the update starts installing, congrats! Your PC is fully compatible.
3. What If Your PC Is Not Fully Supported? (The Bypass Route)
But what if your PC doesn’t meet all the requirements? If your machine is from 2010 or newer, but it’s showing messages like “The processor isn’t supported” or “TPM 2.0 is missing,” you may still be able to install Windows 11 24H2 with a few tricks.
Common Compatibility Issues
Here are the typical reasons why your PC might be considered “not supported”:
- Lack of TPM 2.0: Some older systems don’t have the required TPM 2.0 module. TPM 2.0 is critical for security in Windows 11, but some systems only have TPM 1.2 or none at all.
- Missing Secure Boot: Secure Boot is another security feature that some older BIOS/UEFI setups don’t support or don’t have enabled.
- Processor Incompatibility: If your processor is older than an 8th-gen Intel or its equivalent from AMD, Windows 11 might block the update because your CPU doesn’t support key features like SSE4.2 or PopCnt.
The Bypass Method
For those who still want to update, there are bypass methods to get around these restrictions. The easiest way is to use a tool like Rufus 4.6+, which allows you to create a bootable USB that skips the TPM, Secure Boot, and processor checks.
Here’s how you can bypass these requirements using Rufus:
- Download Rufus from the official website.
- Download the Windows 11 24H2 ISO file from Microsoft’s website.
- Open Rufus and select your USB drive.
- Choose the Windows 11 24H2 ISO, and make sure you check the option to bypass Unsupported Processor, TPM 2.0 and Secure Boot.
- Boot your PC from the USB drive and install Windows 11 24H2. If you already have Windows 11 23H2 or 22H2 or Windows 10 22H2 … insert the USB (Windows 11 24H2) created with Rufus and run… the setup.exe and follow along to upgrade to 24H2.
While this method will allow you to install Windows 11 24H2, it’s important to note that some features (especially security-related ones) may not work as intended on older systems.
4. When Your PC Won’t Support Windows 11 24H2 – Even with a Bypass
Now, let’s talk about the worst-case scenario: PCs built before 2010. These older systems often lack critical hardware support for features that Windows 11 relies on, and even bypass methods won’t work. For instance, some older processors don’t support key instructions like SSE4.2 (a multimedia instruction set) or PopCnt (a feature required for certain modern apps to function properly).
If your system shows any of these 2 messages during an upgrade attempt, it’s a sign that Windows 11 24H2 simply isn’t going to run:
- “This PC’s processor doesn’t support a critical feature (PopCnt).”
- “This PC’s processor doesn’t support SSE4.2.”
In these cases, even Rufus won’t be able to bypass these hardware limitations, and you’ll be stuck with an older version of Windows 11 23H2 (bypass).
What Versions of Windows Will Still Work?
If you’re running a PC from before 2010, the best you can hope for is running earlier versions of Windows 11, like Windows 11 21H2, 22H2, or 23H2, which have looser hardware requirements and can usually be installed using a bypass method.
However, Windows 11 24H2 is officially out of reach for these systems, as the performance and security risks would be too great without the necessary hardware support.
5. How to Perform an In-Place Upgrade to Check for Compatibility
The best way to find out if your PC supports Windows 11 24H2 is to try performing an in-place upgrade. Here’s how:
- Open Settings on your Windows 10 or older Windows 11 system.
- Go to Update & Security > Windows Update.
- Check for updates.
- If your PC is compatible, the Windows 11 24H2 update will be listed, and you can install it.
- If your PC isn’t supported, you’ll see specific messages explaining why—these could include missing TPM 2.0, Secure Boot, or an unsupported processor.
- In case Failure upgrade from Settings, … Then try from a USB stick bootable Windows 24H2 bypass created using Rufus 4.6+ … run setup.exe.
- This will give you a clear indication of whether you can upgrade smoothly, whether a bypass is required, or if your PC just isn’t going to support this version of Windows.
6. Conclusion: Know Your PC’s Limits and Options
To summarize, here are the three scenarios:
- Case 1: If you have a system with an Intel 8th-gen processor or newer, you’re good to go! Windows 11 24H2 will install without issue.
- Case 2: For PCs from 2010 to 2017, you may encounter compatibility issues with TPM 2.0, Secure Boot, or processor support, but these can often be bypassed using tools like Rufus.
- Case 3: If your PC was built before 2010, Windows 11 24H2 is out of reach. You can still run earlier versions of Windows 11 23H2 using a bypass, but 24H2 isn’t supported—even with workarounds.
Ultimately, upgrading to Windows 11 24H2 offers great new features, but not every system will be able to take advantage of it. Use the steps outlined above to check your system’s compatibility, and if needed, employ bypass methods to keep your PC running the latest software for as long as possible.
If your PC can’t support Windows 11 24H2, it might be time to consider upgrading your hardware. Staying current is crucial not only for new features but also for ongoing security updates. Thanks for reading, and happy upgrading!
Some special offers of upgrading to newest hardware are the following:
Mini-PC – https://minixpc.com/?ref=off003 — Off 3% [Coupon: off003] plus No Import TAX shipping to the EEA/EU countries.
Important Notes:
- An alternative way to upgrade is rather than run from Rufus 4.6+ USB Windows 11 24H2 the setup.exe to go to CLI/TERMINAL AS ADMIN And run:
G:
cd G:\sources
setupprep.exe /product server
[where G:/ is the drive letter of the Rufus 4.6+ USB drive]
This should Start the upgrade process to 24H2. - Windows 11 upgrade in-place and with keep Files & Apps will work only if language of PC Windows 11 e.g. English USA, the same as language e.g. English USA of the ISO Download Windows 11 from Microsoft website.
Basically the message if unsupported completely should be these 5 issues:
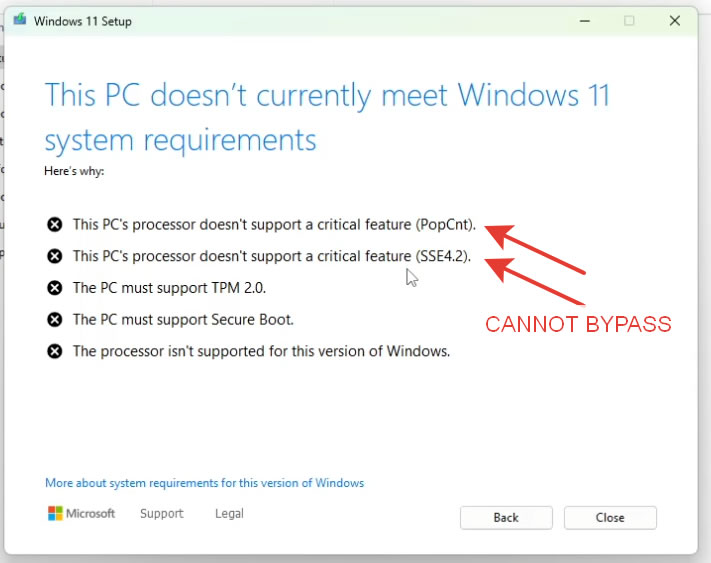
Notes: If the first 2 shown by red arrows – are present, then PC can go till 23H2 bypass. Is too old for Windows 11 24H2 (bypass).


