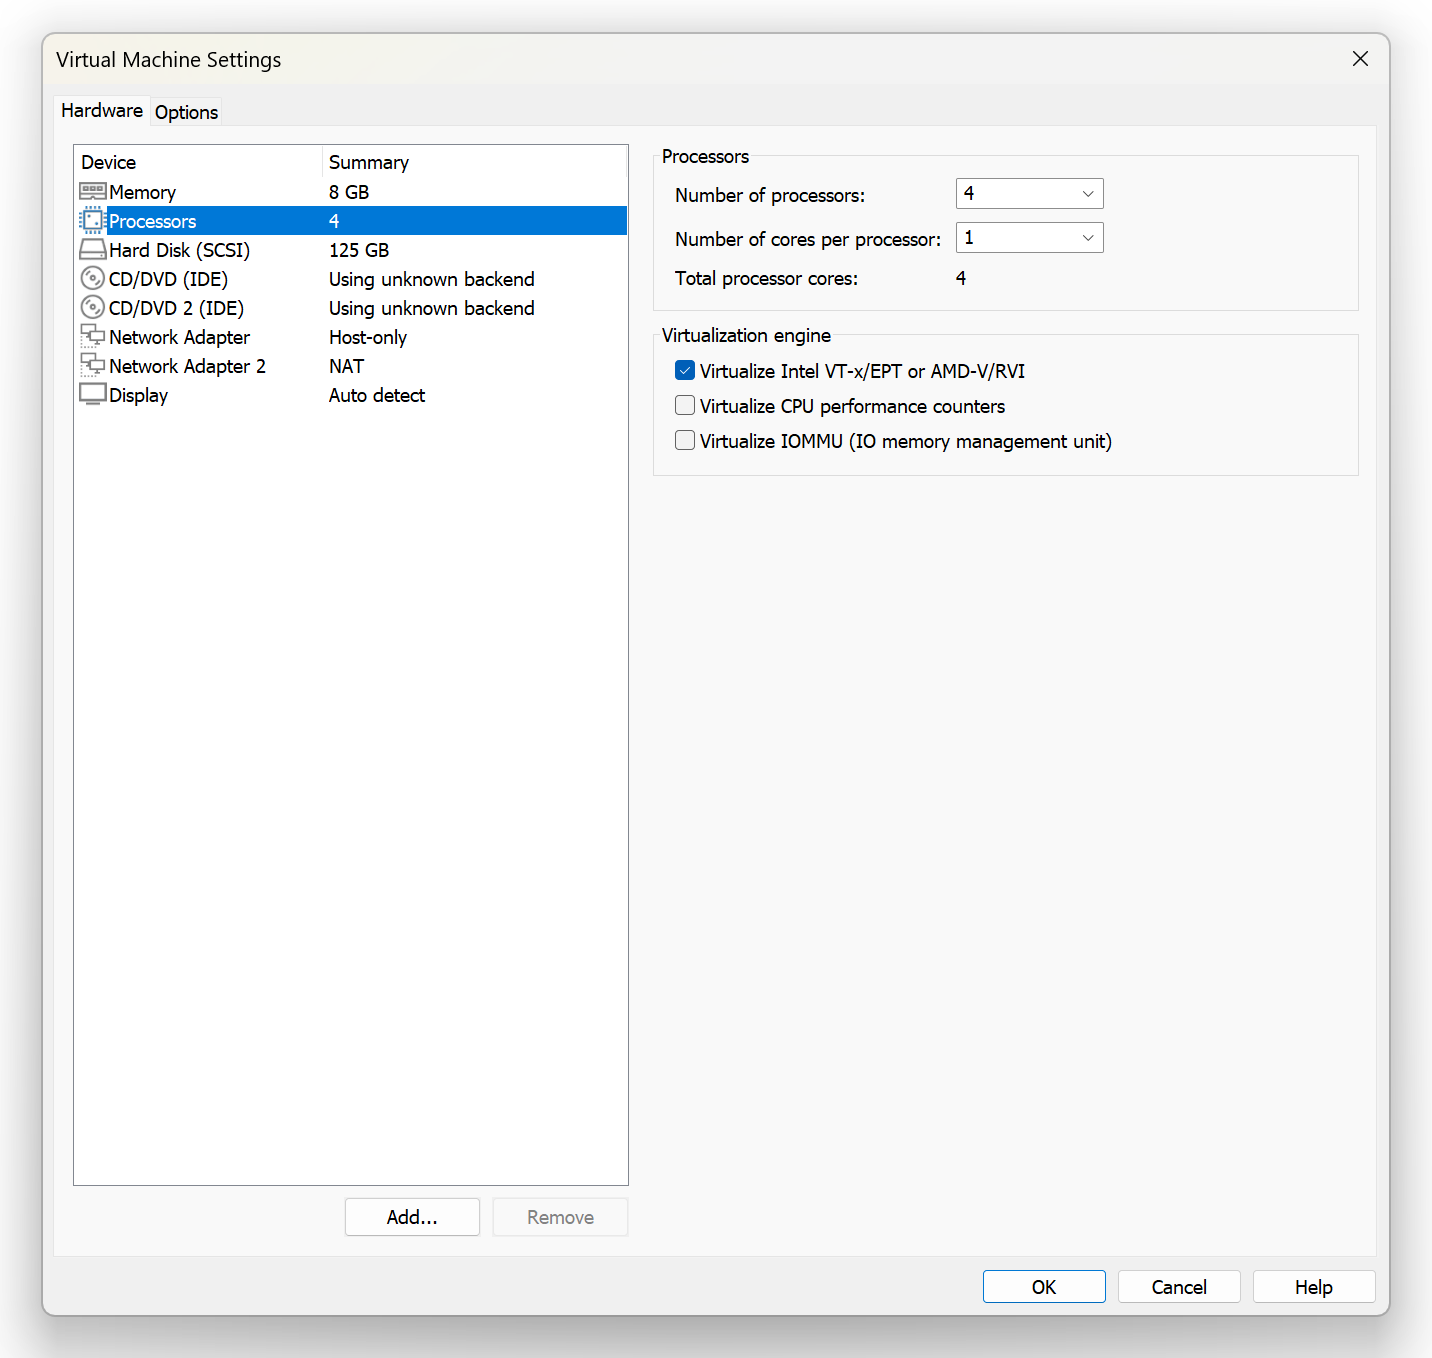
After having downloaded unzipped and imported to VMware Workstation Pro 17.0.2.
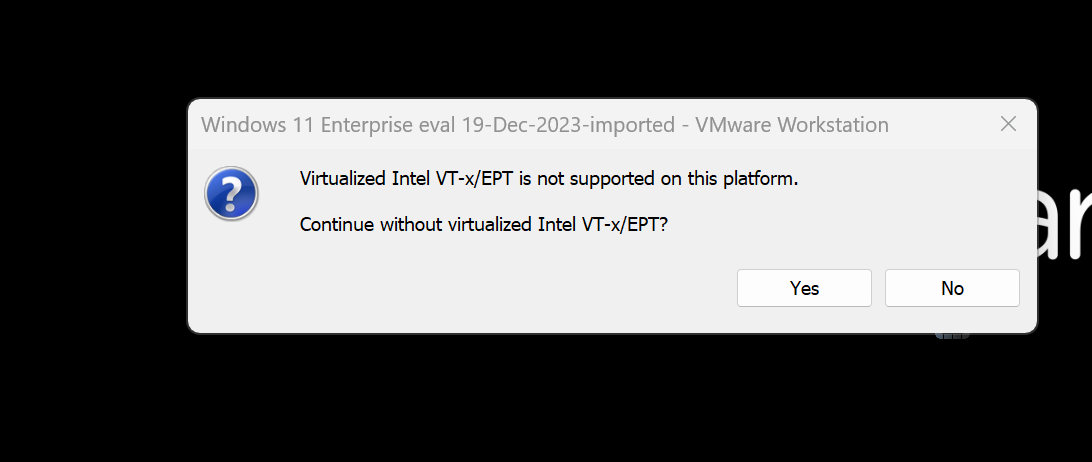
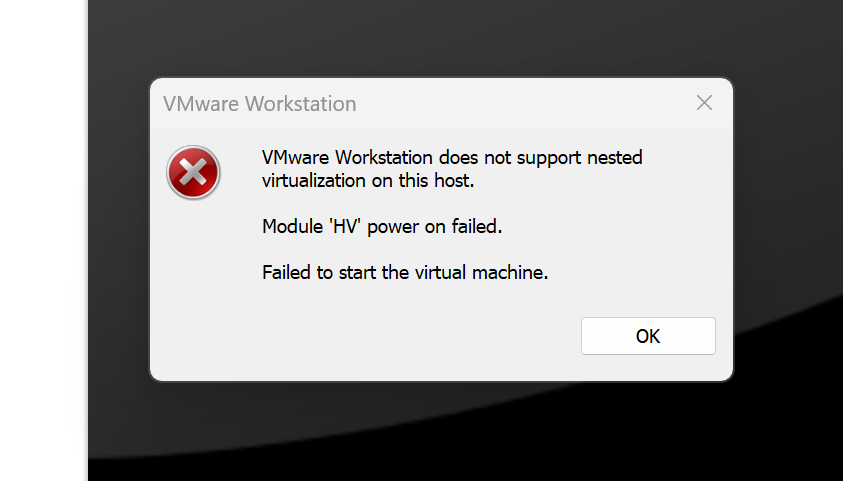
Nested Virtualization problems followed by solution:
SOLUTIONS TO TRY OUT
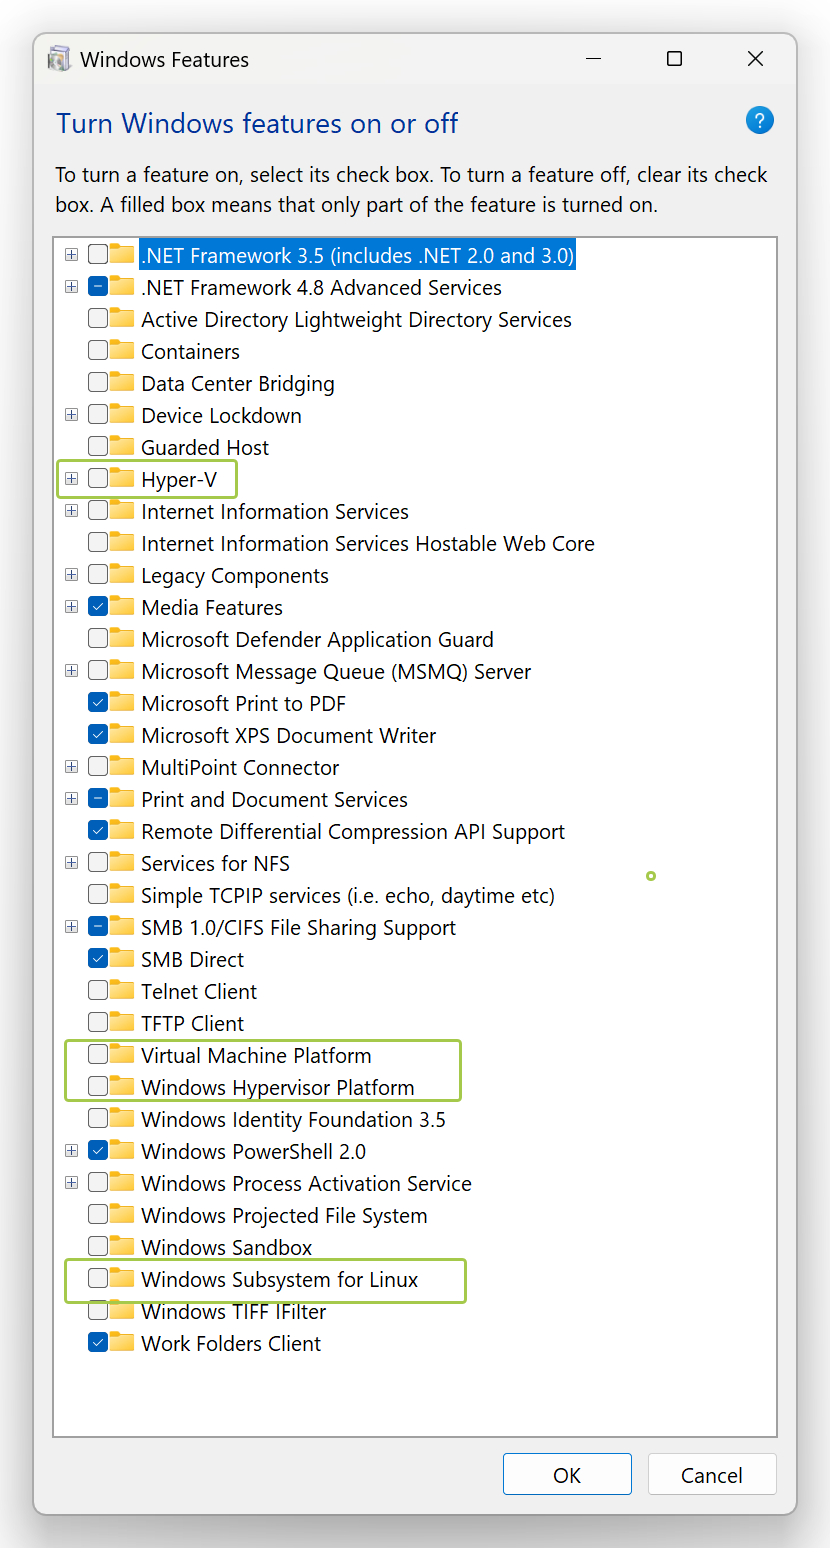
SOLUTION STEP-1
Go to HOST OS: Turn Windows Features On or Off ENSURE THESE 4 GREEN CIRCLED ARE UNCHECKED – IF NOT UNCHECK, AND SAVE AND RESTART.
IF Nested Virtualization problems CONTINUE GO TO STEP 2
===
SOLUTION STEP-2 [After Step-1 still not working]
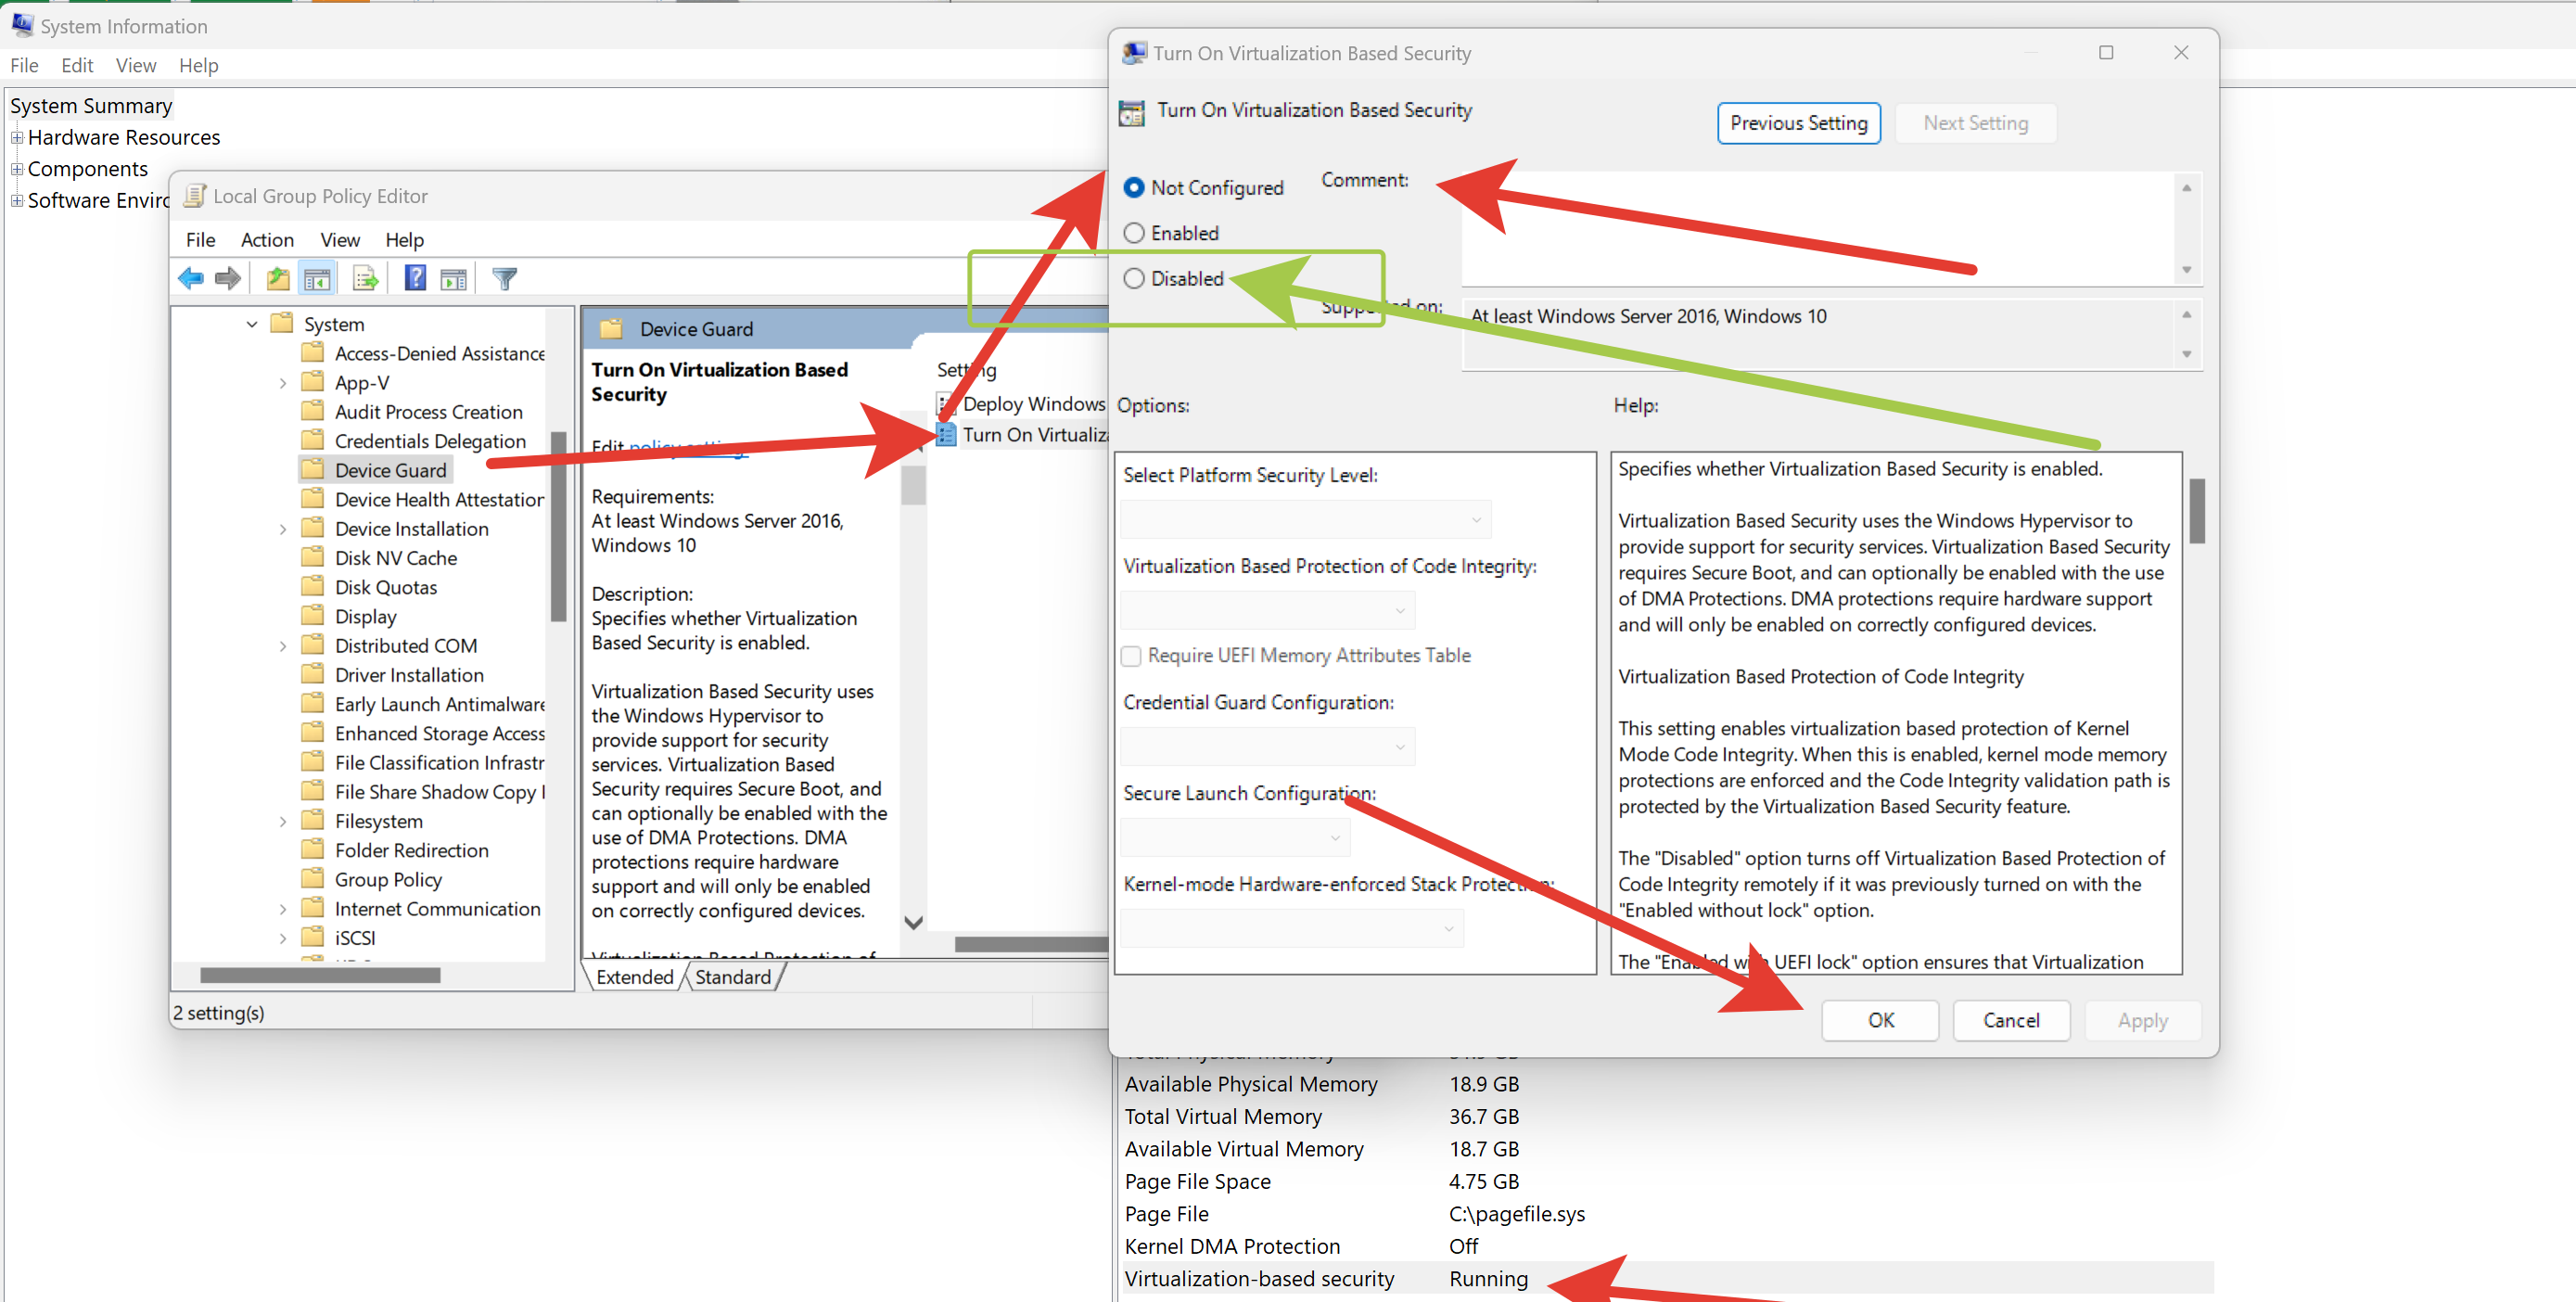
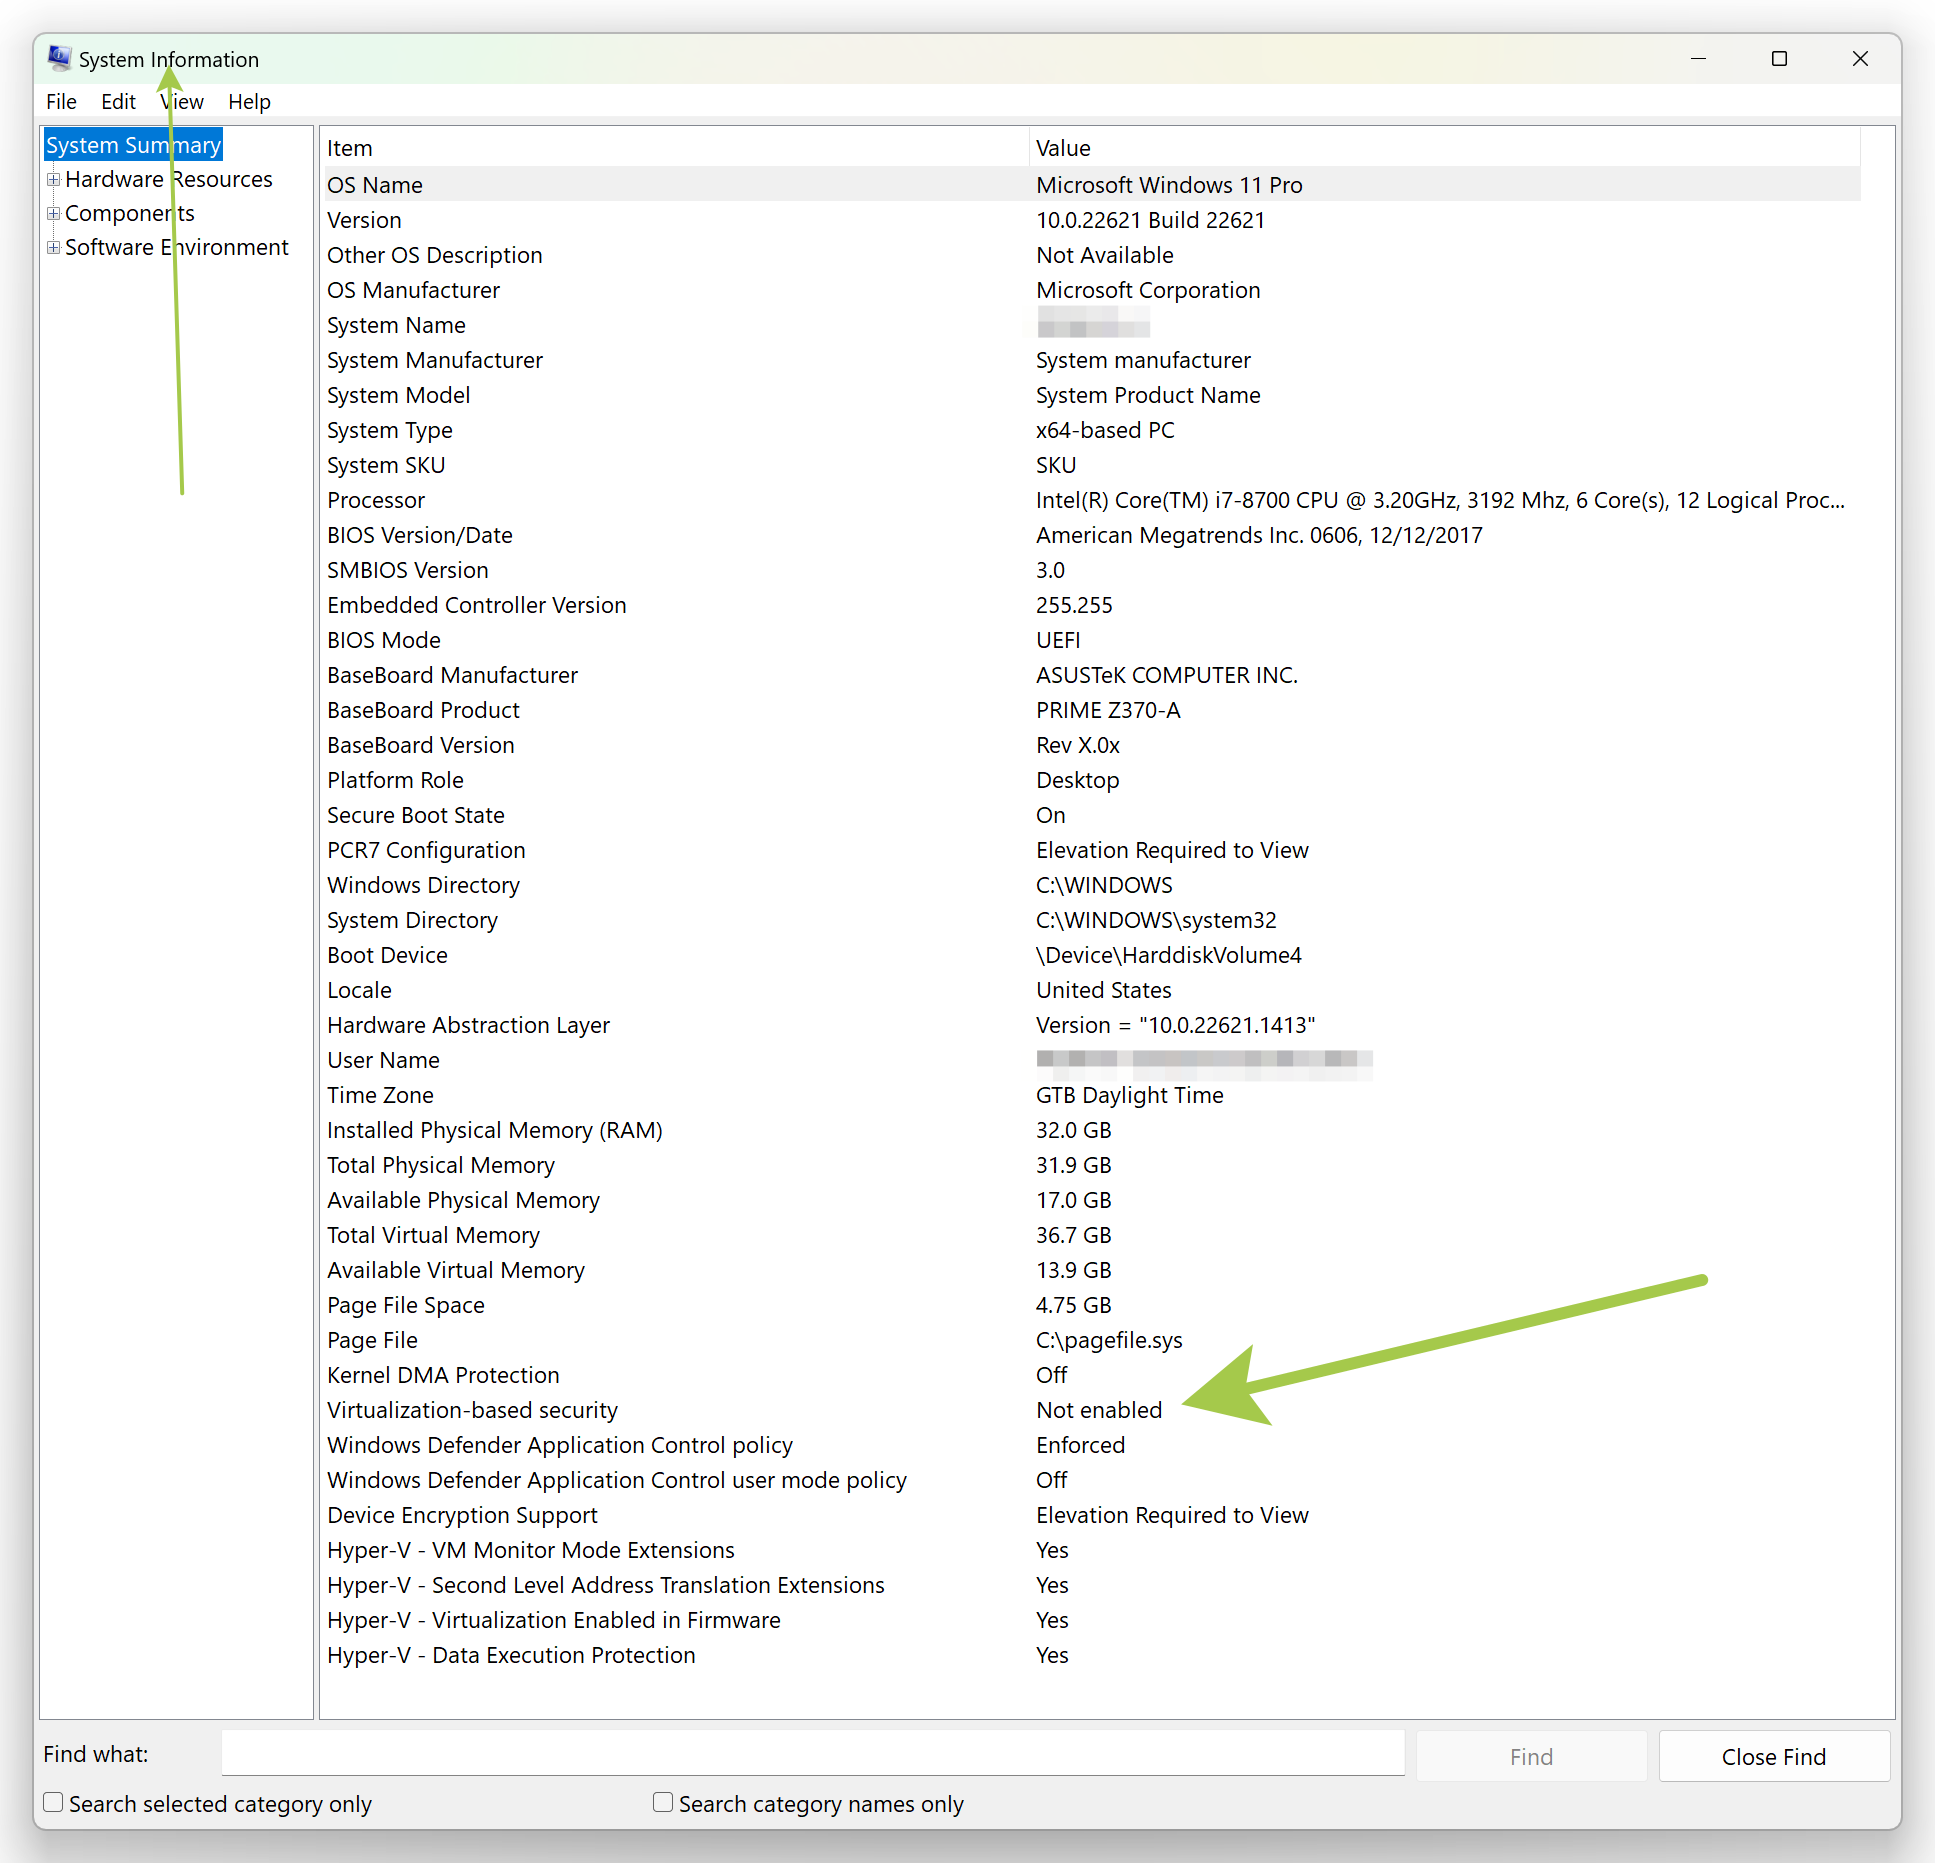
The process to turn off virtualization-based Security:
Below are steps that can be followed to turn off virtualization-based Security for Windows 10 Home & Pro: For Microsoft Windows 10 Pro & above:
Go To: Edit group policy ( gpedit.msc ) Go to Local Computer Policy > Computer Configuration > Administrative Templates > System Double-click on Device Guard on the right-hand side to open. Double Click on “Turn On Virtualization Security” to open a new window It would be “Not Configured”, Select “Disable” and click “OK” Close the Group Policy Editor. Restart the system
TO BECOME:
If you still having problems put in the article comments and I will reply soon!
Create FREE, FRESH & CLEAN Ventura ISO without a Mac
Create Clean Ventura.iso without a Mac computer and Free
In this article I demonstrate how to create a fresh/free-of-malware Ventura ISO without Mac, using a Ventura VM in the free VMware Player 17.x in Windows 11… the full process will cost 0.00 USD.
To run a Guest VM OS MacOS e.g., Ventura, as a VM with VMware or VirtualBox or Parallels hypervisors, in either MacOS or Windows 11 or Linux (hypervisor-patch run required in Windows or Linux) the hardest part is to obtain the Ventura ISO. Of course, you can download it from tutorials in blogs or vlogs on YouTube, but you will never know if malicious software or virus exist inside the ISO, so by hardest part mean to create the ISO by yourself on a Mac 🖥️ computer or another MacOS 🖥️ VM. The latter, I have tested it myself successfully in a MacOS VM in VMware Player 17.x in Windows 11, I have created a Ventura fresh ISO and this WITHOUT a Mac 🖥️ … or any cost!!! Here is the process:
NOTE-1: THIS ISO IS NOT SECURE — BECAUSE THE PERSON WHO CREATED IT MAY INFECT IT WITH A VIRUS ON PURPOSE.
NOTE-2: WE WILL USE THIS TO CREATE VENTURA ISO BECAUSE WE DO NOT HAVE ACCESS TO A MACOS VENTURA Mac MACHINE. DURING THE PROCESS NEVER USE ANY LOGIN TO SENSITIVE ACCOUNT INSIDE THIS VM, TILL WE CREATE THE FRESH ISO AND RUN ANOTHER VM FROM THIS FRESH NEW CREATED VENTURA ISO.
I – Open VMware and run the MacOS Ventura VM or Startup your Mac Ventura Computer.
II – Go to Mac App Store and search & download the: “macOS Ventura.” 1 The macOS Ventura page will open, Click on Get. 2 System Settings will then open, and it will check for the update. And you will see a popup screen to download macOS Ventura. Click on Download. 3 The macOS Ventura download process will get started. The macOS Ventura file size is around 12.25 GB. So, the download process will take some time. 4 When the download process gets completed. The macOS Ventura installer will open. 5 Click on the menu: “Install macOS Ventura” from the menu bar and click on the sub-menu “Quit Install macOS”. 6 Setup will ask for confirmation, click on Quit.
III –
After you have to go to the Mac Terminal and run the BOLD commands below:
In the end, you will have a fresh and clean of infections: Ventura ISO on your Mac VM Desktop. Please type only BOLD – other characters are the Terminal output and must NOT get typed. >>>
Now, AFTER COPY the Ventura ISO TO A USB STICK – Or backup otherwise – do type the final command to clean up all files Not needed except ISO File:
rm -fv /tmp/Ventura.dmg
========================== End Of Terminal ==========================
Final Notes:
1 If you want to COPY the Ventura ISO to a USB Stick, please insert an EXFAT FORMATED USB 3 STICK, While the VM is running, Hypervisor then asks if opens in the Host OS or in the Guest OS, choose Guest OS and COPY the ISO to this USB Stick.
PLEASE SHUTDOWN HYPERVISOR e.g. VMware Player, then the USB will mount in the Windows 11 host OS, you can shut down Windows 11 to remove the USB Stick or Safety Remove the USB Stick otherwise.
2 With the FRESH-CLEAN-FREE-OF-INFECTIONS Ventura ISO, you can create a VM in Windows 11 or 10, in Linux OS, or in macOS even MacOS Not support Ventura.
3 Important! MARK THE JUST CREATED ISO VENTURA AS CLEAN VM e.g., “Ventura13_2_clean_myself.iso” AND ALSO, MARK VMs you will create with this as Clean ISO. THEN YOU CAN DELETE VM created from NOT TRUSTED ISO FROM THE INTERNET.
If I get requests, I can upload my fresh generated Ventura 13.2.iso to Google Drive for public download.