Bootstrap 5.x Pop-overs As Fast As 3-Steps

Official Docs located here:

https://getbootstrap.com/docs/5.1/components/popovers/

Production Example here:

http://michaeleliasphotovoltaicsystems.com/products.php

STEP-1 [in the place of Popovers – HTML5]:

                    <div class="justify-content-md-center">
                        <h1 class="text-center spacer_bottom">LUXOR SOLAR - Solar Panels</h1>

                        <div class="row justify-content-md-center">
                            <div class="col-xxl-6 col-xl-6 col-lg-6 col-md-12 col-sm-12 col-12">
                                <button id="myPopover1" type="button" class="btn btn-secondary" data-bs-container="body" data-bs-toggle="popover" data-bs-placement="top" >
                                    <img style="max-height: 1000px; height: 100%;" class="img-fluid" src="https://clients2021.s3.eu-central-1.amazonaws.com/Solar/assets/images/JPGs/Solar-Panels/Solar-Panel_LUXOR_Eco_Line_HC_M120_FB_365-385W_166cs-1.jpg" alt="Solar-Panel_LUXOR_Eco_Line_HC_M120_FB_365-385W_166cs" />
                                </button>
                            </div>
                            <div class="col-xxl-6 col-xl-6 col-lg-6 col-md-12 col-sm-12 col-12">
                                <button id="myPopover2" type="button" class="btn btn-secondary" data-bs-container="body" data-bs-toggle="popover" data-bs-placement="top" >
                                    <img style="max-height: 1000px; height: 100%;" class="img-fluid" src="https://clients2021.s3.eu-central-1.amazonaws.com/Solar/assets/images/JPGs/Solar-Panels/Luxor-Solar-Panel-Warramty-LX-PWEX-15plus-EN-1.jpg" alt="Luxor-Solar-Panel-Warramty-LX-PWEX-15plus years" />
                                </button>
                            </div>
                        </div>
                    </div>

STEP-2 [Bottom, Below The Footer]:

<!--===== script start =====-->
<script src="assets/js/jquery.min.js"></script>
<script src="assets/js/popper.min.js"></script>
<script src="assets/js/bootstrap.min.js"></script>

STEP-3 [Bottom, Below/After Step-2]:

<script>

    $(document).ready(function(){

        $("#myPopover1").popover({
            title: '<h6 class="custom-title"><i class="bi-info-circle-fill"></i> LUXOR SOLAR More info</h6>',
            content: '<div><a target="_blank" href="/LX_EL_HC_M120_340-360W_1684x1002x35_SF_158cs_en_low.pdf">Link Doc PDF</a> &nbsp; - &nbsp; <a target="_blank" href="https://www.luxor.solar/en/index-en.html">Luxor Web-Site</a></div>',
            html: true
        });

        $("#myPopover2").popover({
            title: '<h6 class="custom-title"><i class="bi-info-circle-fill"></i> LUXOR SOLAR More info</h6>',
            content: '<div><a target="_blank" href="/LX-PWEX-15plus-EN.pdf">Link Doc PDF</a> &nbsp; - &nbsp; <a target="_blank" href="https://www.luxor.solar/en/index-en.html">Luxor Web-Site</a></div>',
            html: true
        });
   });

</script>

That’s it…!!!

========================
Responsive Bootstrap 5.x Lightbox Gallery

The below Tutorial worked and was tested with Bootstrap 5.0.2 – SUCCESS.

https://getbootstrap.com/docs/5.1/getting-started/download/

I implemented it in Production here: http://www.michaeleliasphotovoltaicsystems.com/projects.php

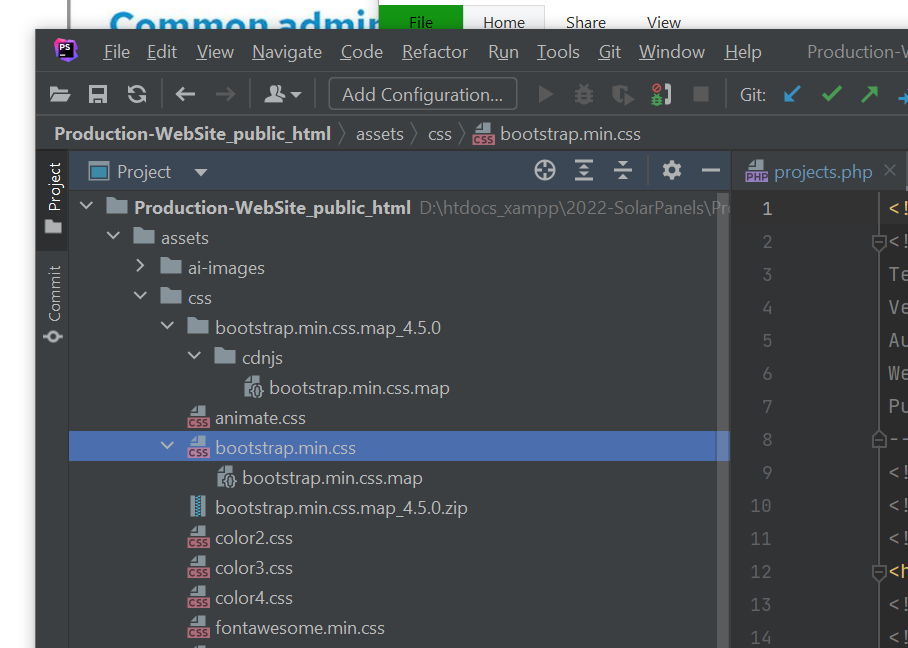
Note: FOUND A DIFFICULTY BUT – Got Error in Browser Console – SOLVED BY DOWNLOADING: bootstrap.min.css.map from

https://www.cdnpkg.com/twitter-bootstrap/file/bootstrap.min.css.map/

AND PUT IN THE SAME FOLDER AS \assets\css\bootstrap.min.css >>>>

JUST 4-STEPS

STEP 1 – HTML 5 – PUT IN HTML IN PLACE OF GALLERY APPEAR

<section class="image-grid">
  <div class="container-xxl">
    <div class="row gy-4">
      <div class="col-12 col-sm-6 col-md-4">
        <figure>
          <a class="d-block" href="">
            <img width="1920" height="1280" src="ireland1.jpg" class="img-fluid" alt="Ring of Kerry, County Kerry, Ireland" data-caption="Ring of Kerry, County Kerry, Ireland">
          </a>
        </figure>
      </div>
      <div class="col-12 col-sm-6 col-md-4">
        <figure>
          <a class="d-block" href="">
            <img width="1920" height="1280" src="ireland2.jpg" class="img-fluid" alt="Fintown, Ireland" data-caption="Fintown, Ireland">
          </a>
        </figure>
      </div>
      <!-- more columns here -->
    </div>
  </div>
</section>

STEP 2 – MODAL POPUP-WINDOW HTML5 – BUT IN THE END OF HTML

<div class="modal lightbox-modal" id="lightbox-modal" tabindex="-1">
  <div class="modal-dialog modal-fullscreen">
    <div class="modal-content">
      <button type="button" class="btn-close btn-close-white" data-bs-dismiss="modal" aria-label="Close"></button>
      <div class="modal-body">
        <div class="container-fluid p-0">
          <!-- JS content here -->
        </div>
      </div>
    </div>
  </div>
</div>

STEP 3 – CSS STYLES IN THE HEAD ELEMENT – PUT IN THE HEAD ABOVE </head>

/* BASIC STYLES
–––––––––––––––––––––––––––––––––––––––––––––––––– */
:root {
  --lightbox: #242424;
}
 
body {
  margin: 24px 0 48px;
  font: 20px / 28px "Marck Script", cursive;
}
 
/* IMAGE GRID STYLES
–––––––––––––––––––––––––––––––––––––––––––––––––– */
.image-grid figure {
  margin-bottom: 0;
}
 
.image-grid img {
  box-shadow: 0 1rem 1rem rgba(0, 0, 0, 0.15);
  transition: box-shadow 0.2s;
}
 
.image-grid a:hover img {
  box-shadow: 0 1rem 1rem rgba(0, 0, 0, 0.35);
}
 
/* LIGHTBOX STYLES
–––––––––––––––––––––––––––––––––––––––––––––––––– */
.lightbox-modal .modal-content {
  background: var(--lightbox);
}
 
.lightbox-modal .btn-close {
  position: absolute;
  top: 20px;
  right: 18px;
  font-size: 1.2rem;
  z-index: 10;
}
 
.lightbox-modal .modal-body {
  display: flex;
  align-items: center;
  padding: 0;
  text-align: center;
}
 
.lightbox-modal img {
  width: auto;
  max-height: 100vh;
  max-width: 100%;
}
 
.lightbox-modal .carousel-caption {
  left: 0;
  right: 0;
  bottom: 0;
  background: rgba(36, 36, 36, 0.75);
}
 
.lightbox-modal .carousel-control-prev,
.lightbox-modal .carousel-control-next {
  top: 50%;
  bottom: auto;
  transform: translateY(-50%);
  width: auto;
}
 
.lightbox-modal .carousel-control-prev {
  left: 10px;
}
 
.lightbox-modal .carousel-control-next {
  right: 10px;
}

STEP 4 – FINAL JAVASCRIPT CODE – PUT AT THE END ABOVE </body>

const imageGrid = document.querySelector(".image-grid");
const links = imageGrid.querySelectorAll("a");
const imgs = imageGrid.querySelectorAll("img");
const lightboxModal = document.getElementById("lightbox-modal");
const bsModal = new bootstrap.Modal(lightboxModal);
const modalBody = document.querySelector(".modal-body .container-fluid");
 
for (const link of links) {
  link.addEventListener("click", function (e) {
    e.preventDefault();
    const currentImg = link.querySelector("img");
    const lightboxCarousel = document.getElementById("lightboxCarousel");
    if (lightboxCarousel) {
      const parentCol = link.parentElement.parentElement;
      const index = [...parentCol.parentElement.children].indexOf(parentCol);
      const bsCarousel = new bootstrap.Carousel(lightboxCarousel);
      bsCarousel.to(index);
    } else {
      createCarousel(currentImg);
    }
    bsModal.show();
  });
}
 
function createCarousel(img) {
  const markup = `
    <div id="lightboxCarousel" class="carousel slide carousel-fade" data-bs-ride="carousel" data-bs-interval="false">
      <div class="carousel-inner">
        ${createSlides(img)}
      </div> 
      <button class="carousel-control-prev" type="button" data-bs-target="#lightboxCarousel" data-bs-slide="prev">
       <span class="carousel-control-prev-icon" aria-hidden="true"></span>
       <span class="visually-hidden">Previous</span>
      </button>
      <button class="carousel-control-next" type="button" data-bs-target="#lightboxCarousel" data-bs-slide="next">
        <span class="carousel-control-next-icon" aria-hidden="true"></span>
        <span class="visually-hidden">Next</span>
      </button>
    </div>
    `;
 
  modalBody.innerHTML = markup;
}
 
function createSlides(img) {
  let markup = "";
  const currentImgSrc = img.getAttribute("src");
 
  for (const img of imgs) {
    const imgSrc = img.getAttribute("src");
    const imgAlt = img.getAttribute("alt");
    const imgCaption = img.getAttribute("data-caption");
 
    markup += `
    <div class="carousel-item${currentImgSrc === imgSrc ? " active" : ""}">
      <img src=${imgSrc} alt=${imgAlt}>
      ${imgCaption ? createCaption(imgCaption) : ""}
    </div>
    `;
  }
 
  return markup;
}
 
function createCaption(caption) {
  return `<div class="carousel-caption">
     <p class="m-0">${caption}</p>
    </div>`;
}

Useful Notes – Ubuntu/Ubuntu Studio 22.04 LTS “Jammy Jellyfish”

I use Ubuntu Studio 22.04 LTS “Jammy Jellyfish” because comes with many-many preinstalled Apps.

Main Things to do after installing Ubuntu Studio 22.04 LTS “Jammy Jellyfish”
========

I have chosen Ubuntu Studio 22.04 LTS because I do Graphic and Video Editing along with my main Programming work…
[Support: Ubuntu Studio 22.04 LTS (Jammy Jellyfish) will be supported for 3-years until April 2025.]
[Note: Ubuntu 22.04 LTS is supported for 5-years.] 
[Direct upgrades to Ubuntu Studio 22.04 from supported versions prior to 21.10 are not supported.]

Main Things To Do:

  1. Get your system ready with updates and repositories. Get familiar with auto-updates [Software & Updates, Software Center]
    sudo apt update && sudo apt upgrade
  2. Install applications of your choice from the software center, mainly Programming IDEs/Editors, because Content Creation Apps are come preinstalled already in Ubuntu Studio.  
    https://linuxconfig.org/things-to-install-on-ubuntu-20-04 
    [ COMPLETE GUIDE FOR MANY-MANY SOFTWARE Apps INSTALLATION ]
  3. Give your Ubuntu OS a different color [ Settings > Appearance ]
  4. Get familiar with the new screenshot tool. [ When you press the Print Screen button to take the screenshot, it opens the UI and gives you the option to take the screenshot of the selected area, entire screen, or current application window. ]
  5. Know about cleaning your system. The classic apt autoremove command is a good way to remove packages that are not required anymore. https://linuxhint.com/why_apt_get_clean/
    sudo apt autoremove
  6. Master the keyboard shortcuts
    Ctrl + Alt + T: Ubuntu terminal shortcut [instead of opening a terminal use Alt+F2 to run the console]
    Ctrl + Q: Close an application window
    Alt + Tab: Switch between running applications
    Super[Win] + Space: Change input keyboard e.g. En <->Ru
    Ctrl + Alt + arrow: Move between workspaces
    Ctrl + Alt + Del: Log out
    Go to Settings->Devices->Keyboard [for Custom Keyboard Shortcuts]
  7. OTHER SPECIAL THINGS OF INTEREST SEE BELOW

========
Other Special Things you will do, if you want it, by REFERENCES ONLINE:  
========
1-DUAL BOOT WINDOWS-LINUX   
https://www.freecodecamp.org/news/how-to-dual-boot-any-linux-distribution-with-windows/
2-UBUNTU AS VIRTUAL MACHINE IN VMWARE HYPERVISOR  
https://www.linuxvmimages.com/images/ubuntustudio-2204/
https://linuxconfig.org/install-vmware-tools-on-ubuntu-22-04-jammy-jellyfish-linux
3-HOW TO INSTALL STEAM ON UBUNTU 22.04 FOR GAMING ON LINUX   
https://linuxconfig.org/how-to-install-steam-on-ubuntu-16-04-xenial-xerus
4-DO NOT DISTURB MODE UBUNTU    
https://ur9r.com/how-to-use-do-not-disturb-mode-in-ubuntu-so-you-can-focus-on-your-work/  
5-INSTALLING DESKTOP ENVIRONMENTS  
https://linuxconfig.org/how-to-install-ubuntu-studio-desktop-environment-on-ubuntu-20-04
https://linuxconfig.org/ubuntu-20-04-cinnamon-desktop-installation
6-1-KEYBOARD SHORTCUTS   
https://help.ubuntu.com/stable/ubuntu-help/shell-keyboard-shortcuts.html.en
6-2-SET KEYBOARD SHORTCUTS   
https://help.ubuntu.com/stable/ubuntu-help/keyboard-shortcuts-set.html.en
6-3-SCREENCAST & SCREENSHOTS KEYBOARD SHORTCUTS   
https://help.ubuntu.com/stable/ubuntu-help/screen-shot-record.html

============

I major/critical advice from the Source of
========
Ubuntu & Ubuntu Studio – Linux: www.ubuntustudio.org for current-old users of Ubuntu Studio 20.04, about the upgrade to all new Ubuntu Studio 22.04 LTS, NOT TO DO SO… BUT DO INSTEAD A CLEAN INSTALL OF 22.04!!!
https://ubuntustudio.org/2022/04/ubuntu-studio-22-04-lts-released/ >>>>

Upgrading

Since it’s just out, you may experience some issues, so you might want to wait a bit before upgrading.

Due to the change in the desktop environment that started after the release of 20.04 LTS, direct upgrades from 20.04 LTS are not supported and may only be attempted at-your-own-risk. As with any system-critical operation, back-up your data before attempting any upgrade. The safest upgrade path is a backup of your /home directory and a clean install.

We have had anecdotal reports of successful upgrades from 20.04 LTS (Xfce desktop) to later releases (Plasma desktop), but this will remain at your own risk, and it is highly recommended to wait until 22.04.1 is released in August before attempting such an upgrade.

Instructions for upgrading are included in the release notes.

========

Personally, I did a clean install of Ubuntu Studio 22.04 in VMware Workstation Pro 15 – and would recommend it because this allows you to clean up and start fresh with Ubuntu Studio 22.04 LTS with a new set of applications and a new desktop environment.

LSE